PLAN OF
ACTION
Investigate the contents and
organization of the Cisco Systems online documentation. Prepare a written plan
of action describing how you will accomplish the following tasks:
PART A
Connect a PC, via the serial port, to the console port of a Cisco 2600
Access Server.
We will use a console cable shown in Figure 1. that has one of its ends as an adapter to connect to the serial port on the computer we will use to connect.
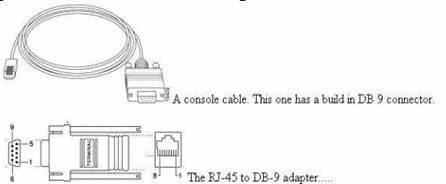
Figure 1
The following steps illustrate how we are going to connect our PC, via the serial port, to the console port of a Cisco 2600 Access Server.
1) The first step is to connect the adapter to a Com port on our PC.
2) The second step is to connect the other end of the cable which looks like an Ethernet connection to the console port of the router.
3) On a Windows 2000 computer select Start, Programs, Accessories, Communications, and HyperTerminal.
4) After HyperTerminal opens, we are going to select a name and Icon for our connection. After that we will select the Com port we are using to connect. By looking at the computers case, we will know which Com port we are using.
5) Next we are going to setup the Com port properties. We are going to use the following terminal settings:
· 9600 baud rate
· No parity
· 8 data bits
· 1 stop bit
· No flow control
PART B
Employ the PC, and its HyperTerminal application, to set the 2600’s
name and enable secret to specified strings and remove the enable password and
console password.
1. The first step is to
check if we have access to the router. If we do, we are going to type show
version and record the setting of the configuration register; which is
usually 0x2102 or 0x102.
2. If we don't have access
to the router (because of a lost login or TACACS password), we can safely
consider that our configuration register is set to 0x2102.
3. The next step is to turn
off the router and then turn it back on using the power switch.
4. We will press Break
on the terminal keyboard within 60 seconds of the power-up to put the router
into ROMMON.
If
the break sequence doesn't work, we are going to use the following possible key
combinations for Break Sequence for password recovery.
Standard
Break Key Combinations
|
Platform |
Operating System |
Try This |
|
|
HyperTerminal |
IBM Compatible |
Windows 2000 |
Ctrl-Break |
|
HyperTerminal (version 595160) |
IBM Compatible |
Windows 95 |
Ctrl-F6-Break |
|
Kermit |
Sun Workstation |
UNIX |
Ctrl-\l |
|
Ctrl-\b |
|||
|
Microphone Pro |
IBM Compatible |
Windows |
Ctrl-Break |
|
Minicom |
IBM Compatible |
Linux |
Ctrl-a f |
|
ProComm Plus |
IBM Compatible |
DOS or Windows |
Alt-b |
|
Telix |
IBM Compatible |
DOS |
Ctrl-End |
|
Telnet to Cisco |
IBM Compatible |
N/A |
Ctrl-] |
|
Teraterm |
IBM Compatible |
Windows |
Alt-b |
|
Terminal |
IBM Compatible |
Windows |
Break |
|
Ctrl-Break |
|||
|
Tip |
Sun Workstation |
UNIX |
Ctrl-], then Break or Ctrl-c |
|
~# |
|||
|
VT 100 Emulation |
Data General |
N/A |
F16 |
|
Windows NT |
IBM Compatible |
Windows |
Break-F5 |
|
Shift-F5 |
|||
|
Shift-6 Shift-4 Shift-b (^$B) |
|||
|
Z-TERMINAL |
Mac |
Apple |
Command-b |
|
N/A |
Break-Out Box |
N/A |
Connect pin 2 (X-mit) to +V for half a second |
|
Cisco to aux port |
N/A |
Control-Shft-6, then b |
|
|
IBM Compatible |
N/A |
Ctrl-Break |
5.
Next we will type confreg 0x2142 at
the rommon 1> prompt to boot from Flash without loading the configuration.
6.
Now we want to reboot the router with ignoring the saved configuration. In
order to accomplish this task we will type reset at the rommon 2>promtpt.
7.
Type no after each setup question or press Ctrl-C to skip the
initial setup procedure.
8.
To put the router in enable mode we will type enable at the Router>
prompt.
We
will be in enable mode and see the Router# prompt.
9. Important: Type configure
memory or copy startup-config running-config to copy the nonvolatile
RAM (NVRAM) into memory.
Do
not type configure terminal.
10.
Type write terminal or show running-config.
The
show running-config and write terminal commands show the
configuration of the router. In this configuration we see under all the
interfaces the shutdown command, which means all interfaces are
currently shutdown. Also, we can see the passwords (enable password, enable
secret, vty, console passwords, and so on) either in encrypted or unencrypted
format. The unencrypted passwords can be re-used, the
encrypted ones will have to be changed with a new one.
11.
We are now going to type configure terminal and make the changes.
The
prompt is now hostname(config)#.
12.
To change the enable
secret password, we will type enable secret <password>.
13.
Next we will issue the no shutdown command on every interface that is
used.
By
issuing a show ip interface brief command, every interface that we want
to use should be "up up".
14.
Next we type config-register 0x2102, or the value we recorded in step
2.
15.
We then leave the configuration mode by pressing Ctrl-z or end.
The
prompt is now hostname#.
16.
Next we type write memory or copy running-config startup-config
to commit the changes.